Tuesday, May 22, 2012

Homemade Cinnamon Rolls

Happy Tuesday!

So I am sure you have noticed that my blog is called 'Cakes & Sweet...Oh my!' right? Well last Friday, I decided to explore the 'sweets' by making homemade cinnamon rolls from scratch.  Let me just say that I am happy that I had a lot of spare time on Friday evening.  Since I am always on the go, I decided to just relax on Friday evening as I had a busy weekend planned.  During last week, I decided that I wanted to surprise my boyfriend and make him some homemade cinnamon rolls.  I found the perfect recipe on the Carnal Dish website.  The recipe was very easy to follow and provided pictures of what the dough should look like at each step.  I am a visual person, so I loved that fact that pictures were provided.  

This was my first time making anything from scratch, especially dough.  For me the homemade dough reminded me of fondant, especially when it came to kneading it.  I was pleased with the fact that I was able to transfer some of my cake baking skills over. It makes me feel as though everything is coming together along my baking journey.  As I stated above, I am happy that I had a lot of spare time available as extra time as it is definitely needed for allowing the dough to rise properly.  There are four basic steps to making home made cinnamon rolls, as noted below:
  1. Prep your space
  2. Prepare the dough
  3. Make the filling 
  4. Prepare the icing 
Several hours later after completing the above steps, I completed my first set of homemade cinnamon rolls!  

Check out the picture below and let me know what you think!


Oh and in case you were wondering, my boyfriend LOVED the cinnamon rolls and enjoyed his surprise!  

Until my next baking adventure....

~L.B~

Tuesday, May 15, 2012

My first cupcake order - COMPLETE!

So.... I completed my FIRST cupcake order!  In my last posting I mentioned that I received my first cupcake order for birthday cupcakes.  A good friend of mine is having a birthday tomorrow, so I made her some special birthday cupcakes.  My original idea was to put bow fondant toppers on all of the cupcakes, but then my idea took a turn.  I wanted to incorporate numbers and stars into my plan as well.  So in addition to the bow toppers, I made double fondant layer stars and placed the number '30' on each of them.  I am starting to realize that whenever I have a plan for my cupcakes, the plan always seem to deviate and come together in the end.  In order to bring the bows together with the stars, I put stars in the middle of the bows.  

Check out the final results below:


I received feedback from my friend and she loves them! Of course this puts a huge smile on my face.  I was more than happy to make these cupcakes for her, especially for her birthday.

Happy Birthday Shane'a!  :-)

Until next time cake lovers & friends...

~L.B~


Wednesday, May 9, 2012

My first cupcake order

Happy Wednesday folks!

We are almost to the weekend, halfway there - woo-hoo!  

So great news everyone, I officially have my first cupcake order!  Yaaaaaaaay! A friend of mine recently asked that I make her some cupcakes for her birthday coming up next week.  I was honored by the fact that she would ask me to do such a thing for her. :-)

I brainstormed over the weekend trying to think of a cute idea for her cupcakes.  I decided to use one of the techniques that I learned in my last cake class on how to make a bow.  Instead of making a solid bow, I decided to pick two colors and alternate them.  Below is a picture of the bows that I started last night, only 8 more to go!  

Check them out, let me know what you think....


~L.B~

Thursday, May 3, 2012

Cinco de Mayo inspired cupcakes :-)

With all the festivities of Cinco de Mayo coming up this weekend, I decided to make some cupcakes for my friends.  We are all going to be hanging out and celebrating this weekend, and what better item to add to the celebration than cupcakes!  I spent most of the  week going back and forth with several ideas and looking on Pinterest for inspiration for what I wanted my cupcakes to look like.  I decided to go with two different types of cupcakes.  One with a chilli pepper on it made out of a fondant, then a flag that I can just stick in the cupcake.  I can't wait to give them to my friends this weekend, I hope they like them.  :-)

Check out my picture below of the cupcakes.


What do you think?

~L.B~

Tuesday, May 1, 2012

Ready-made fondant vs. Marshmallow fondant

Happy Tuesday!

Over the weekend I had my first trial run at making a fondant cake, you can see the picture of the cake in my post from yesterday.  After making the cake I struggled with whether or not I would actually cut into and eat it. You're probably asking me why not just eat the cake?  Well...  My fondant cake was by far my favorite cake, so I knew it would take me a second to finally cut into it.  I finally cut into the cake last night, mainly because I wanted to taste the fondant. I have been receiving several reviews about how ready-made fondant does not have a great taste. After tasting the cake last night, I will say the taste was not that bad.  After a few of the reviews I heard, I was expecting the ready-made fondant to taste like cardboard.  Though it did not have the sweetest of all tastes, I did taste a hint of sugar. If I had to give ready-made fondant a grade, I would give it a B-.  

Now that I completed the task of making an entire cake out of ready-made fondant, I wanted to try my hand at marshmallow fondant (also known as MMF).  Let me just say, the reviews were positive across the board on the taste of marshmallow fondant.  Last night after getting home from teaching my Zumba class, I made up a batch of marshmallow fondant.  Yesterday during the day I did several searches online for a marshmallow fondant recipe that would be easy for me to follow.  I found one recipe in particular that I liked and I was able to create my marshmallow fondant with ease.  It took me about 20 minutes total to create the fondant.  Since I was not using the fondant immediately, I placed it in saran wrap and then sealed it in a plastic bag.  I am working on a project for this upcoming weekend in which I will use my marshmallow fondant. I will say, while making the marshmallow fondant I did taste it and it tasted AMAZING! So my grade for the taste of marshmallow fondant is an A+!  

I will let you know how the marshmallow fondant worked for my project later on the week.  :-)

So tell me, besides marshmallow fondant what other ready-made brands do you recommend? 

~L.B~


Monday, April 30, 2012

Let's get organized - Tool Caddy

So after just taking 8 weeks of cake classes I have collected A LOT of cake tools and supplies.  After searching through my kitchen over the weekend for my spatulas, only to find out they were on the counter the WHOLE time.  I realized I needed to get organized.  I had cake supplies everywhere and they were slowly taking over my kitchen.  After completing my final cake class for Course 3, I bought myself a gift - a TOOL CADDY!

When I got home last night, I immediately put all of my supplies into the caddy and began organizing my stuff.  So let me just tell you, it's pretty much already full.  :-/ But at least I am organized!  I took a picture of my tool caddy.  Check it out!


What do you use to organize your supplies and tools?

~L.B.~

Course 3: Gum Paste & Fondant - Complete!

Happy Monday!

I hope all of you had a wonderful weekend.  Yesterday, I finished my final cake class for Course 3: Gum Paste & Fondant.  As I mentioned in one of my previous blog posts, I wanted to center my cake around the bow that I made in class last week.  My cake was a two-layered cake with purple fondant, a white bow, and pink and green flowers.  Check it out below! :-)


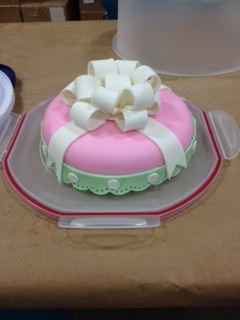
My classmate (http://onepreppycookie.blogspot.com/) made the following cake, also centered around the bow.
So there you have it, after four weeks of class we were able to create an entire cake made of fondant.  :-)

What do you think?